
Priest
Example 1
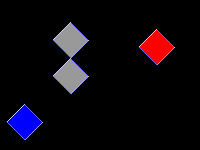
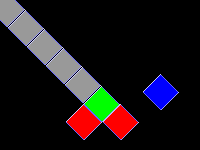
Starting off rather simply, this is really a very unlikely scenario. You (blue), a Priest with Deo Shaghaid who's hunting alone, ran into an enemy (red) near a tree (grey).
One way of killing the enemy would be to run around and cast Deo Shaghaid as if you were a Rogue. However, chances are you'll get hit every once in a while (especially when encountering the vicious lag beast) and you'll probably be doing more running than casting, attracting other enemies as you wander about.
Instead, position yourself next to the tree like so. This way the enemy doesn't stand a chance of reaching you. You can just sit back and cast Deo Shaghaid at your own pace, removing puinsein and such from yourself when required.
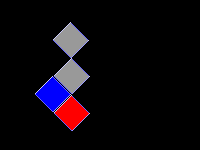
Example 2
Moving on to something a bit more common. In this example, you (blue) will be alongside a Warrior/Monk (green) against two enemies (red) with a wall in between (grey). Since the enemies are both close to the edge of the wall, the Warrior/Monk doesn't stand a chance of blocking them off on his own.
Many Priests would do as such: Let the Warrior/Monk worry about that and simply go about your healing business. Unfortunately, it's your mana which will be drained, thus making it your problem as much as your partner's.
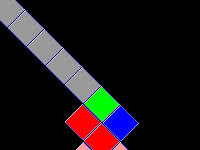
The good part about this situation is that it's very simple to prevent. Simply stand next to your partner and both enemies will be sealed off. Since all you need to do is heal, you might as well stand here as anywhere else. Since the lower enemy is targeting the Warrior/Monk, that's none of your concern either - think of yourself as part of the wall.
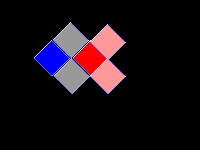
Example 3

A bit more advanced now, but still one of the simpler situations that you should be able to handle with little to no practice. You (blue) along with two Warriors/Monks (green) against two enemies (red) in an open field. Naturally you'll want to prevent the second enemy from reaching your Warriors/Monks before they're done with the first enemy.

This is how you should not do it. Standing idly by will consume your mana in no time. Even if you do have plenty of mana, it'll mean one heck of a repair bill for the poor Warrior/Monk, so it's really not a good move to just stand by and watch.

Instead, stand next to the lower one of your allies (in this case - it varies depending on who the enemy is after) to prevent the enemy from reaching him. This way it'll wander back and forth without a direct passage, as shown by the bright red fields. Once the Warriors/Monks are done with the first enemy, the second will have free passage into the field between them, making for another easy kill.
Priest